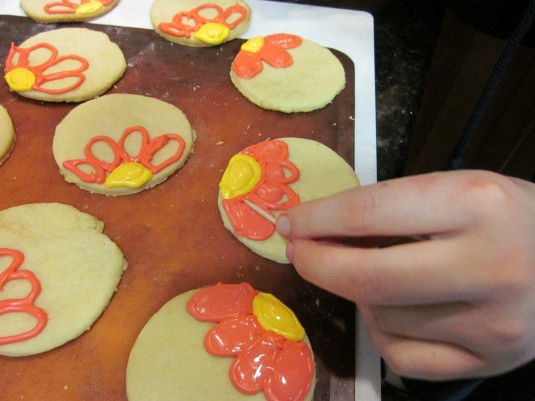
So during my 2-week sweets hiatus I decided to share this lovely recipe for those of who are still interested in baking. These decorated cookies were so cool. I’ve never made these type of decorated cookies before because I always thought they were too hard to master. These cookies aren’t perfect, but I realized they very easy to make and can be made into a variety of shapes and designs.
Basically, this is a simple sugar cookie with a royal icing that hardens when exposes to air.
For the cookies:
Follow the recipe for cookies attached below. Roll out onto a floured surface, and cut into circles. I used a floured glass cup. 
Bake for 10-12 minutes.
Next up, icing!
For this recipe, I was glad to have my lovely KitchenAid (I whipped these up when I was home and a clean kitchen to boot). This recipe involves a lot of mixing, but I want to try them again at campus. Nothing like a arm work-out.
Okay, back to the recipe. A lot of recipes for this type of icing involve either meringue powder or fresh egg whites. Who has meringue powder? It’s great if you make lots of these cookies, but I think you have to order it online or pick it up at baking specialty stores. Not something you can find in the grocery store. As for the egg whites, it’s not great to eat raw eggs, either. So, I searched for a different recipe. This recipe instead uses powdered egg whites. I guess you may not have this in your pantry either, but you can buy this at the supermarket.
Begin by beating the egg whites and powdered sugar until well blended. Gradually beat in the water and flavorings. The recipe called for almond extract or lemon juice. I used almond flavoring, and it gave the frosting a nice hint of almond accenting the almond in the cookie. Continue beating on high until thick and glossy for about 6-8 minutes. This is where the stand mixer comes in handy.  Next up, the food coloring.
Sadly, this icing gets hard fast, so the pictures aren’t great because I was trying to work fast. Divide your icing and add the food coloring. I made turquoise, yellow, and dark pink.

Okay,this is key, and something I’m still a little unfamiliar with. You basically outline the colors, and then flood them in with thinner icing, so you’ll need to make your icing thick enough for the outlining. I’m sorry, but I can’t describe how thick you want the icing for each. The outline will be thinner than regular icing. Put your icing ready for outlining into a sandwich ziploc bag. Cut the smallest piece off the tip of the bag.


 Outline the inside of the flower with the yellow. Do this on all the cookies, so it can harden. Then outline the petals. Next up, add some water (1/2-1 teaspoon) of water to the pink and yellow bags of icing. This will thin out the icing so you can fill in the outline. You want the icing thin enough so that it spreads when you flood in the outline.
Use a toothpick to spread the icing to all the edges. Repeat this for the petals and the inside of the flower for all the cookies. 
Now, let’s do the background. Outline the the edge of the cookie with the turquoise. This icing is a little stiff as you can see below. Repeat with all the cookies.
 Again, add some water to the turquoise icing bag, and flood the turquoise icing into the outline. Use the toothpick to get the icing between the petals.
I added dots to my icing before it hardened. You can add dots or leave it plain.
I added dots then swirled them with the toothpick.
 Not my best work, but I’m so glad I tried this interesting technique. I want to repeat this again with a different design.
They tasted good, too! These are best the first 2 days, after that the icing gets really hard.
Enjoy and Good Luck!
Cookie Recipe from Bake at 350
Icing Recipe from About.com
Recipes: Vanilla-Almond Sugar Cookies


